

Customizing the keyboard type
You can customize the size of the on-screen keyboard, as well as the arrangement, appearance, and size of its keys.
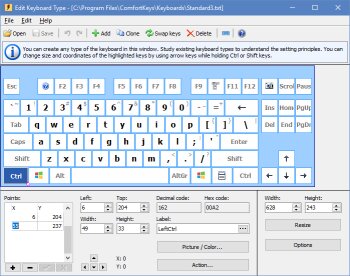
To edit the on-screen keyboard, open the Settings dialog box, select the On-Screen Keyboard item, and then click the Edit... button. By default, the current keyboard type will be opened. To edit another keyboard type, click the File menu, and then click Open.
When editing the keyboard, you can use two types of virtual keys:
| • | Square keys are used by default. Specify only two points for them: the upper-left corner and the lower-right corner. You can use the Width and Height fields for such keys. |
| • | Keys consisting of lines can take any shape. To configure them, use the Points table to specify all points that should be joined by lines, one by one. The last line will be automatically drawn between the first and last points. If necessary, you can use lines to draw a circle or oval. Look at how the Enter key is specified on the standard keyboard. Actually, it is one key, though displayed as two keys. The point [-1, -1] means that the points of one key end and the points of the next key start. |
You can specify all parameters for the keys via the fields in the lower part of the window.
When editing the keyboard, you can use the following features:
| • | Use the mouse pointer to select several keys at once by holding down the Shift key. |
| • | Use the arrow keys to resize one or more selected keys by holding down the Shift key. |
| • | Use the arrow keys to change the position of one or more selected keys by holding down the Ctrl key. |
| • | Change any label. The new label will be displayed on the keys instead of the standard label or character. For instance, you can assign the “Customers” label to the F2 key. You can also change the font of the text or use special characters. |
Assigning an image to any key of the on-screen keyboard
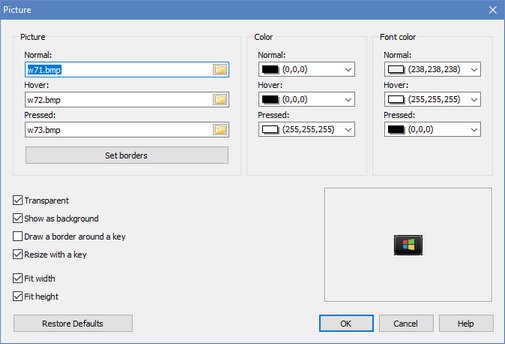
Picture (Normal, Hover, Pressed)
You can assign an image to each key state, or use the same image for all key states.
| • | Normal – The key in its normal state |
| • | Hover – The highlighted key, when the mouse pointer hovers over it |
| • | Pressed – The key when pressed |
Set borders
You can set borders for the picture on the key. When the application resizes the picture, the borders will not change.
Color (Normal, Hover, Pressed)
A key fill color, which is used only if the Picture setting is not used.
Font color (Normal, Hover, Pressed)
You can specify the font to be used for each key state. Font colors can be set even if no images are assigned to keys in the previous fields. If you keep the default setting, the application will use the color values from the theme’s settings.
Transparent
To let the key behind the image show through the image background, select the Transparent check box. To make the image background opaque, unselect the Transparent check box.
Note: The Transparent property works only for images in the Bitmap format.
Show as background
If this option is on, key labels and hotkey icons will be rendered on top of the key image. Otherwise labels and icons will not be shown on the key.
Draw a border around a key
This option comes in handy if the image completely replaces the default style of the key. For example, see the SkinMulticolor keyboard.
Resize with a key
If this option is on, the image will be resized when the key size changes.
Fit width, Fit height
If this option is on, the width and/or height of the image will always be equal to the width and height of the key it was assigned to, respectively.
Additional keyboard settings
If you select this keyboard, Comfort On-Screen Keyboard Pro will change the specified settings:
| • | Change the Fit width option regardless of the application’s settings |
| • | Change the Lock aspect ratio option regardless of the application’s settings |
| • | Always move the keyboard to the lower edge of the screen |
| • | Always display labels and icons in the center of keys |
| • | Always transparent keyboard background |
| • | Fixed font size for all key labels (if empty, use the one from the application’s settings) |
| • | Dividing points – This option is used when the keyboard size changes. The keyboard splits along the specified points, and the keys slide in opposite directions. |
States:
![]() - Don’t change
- Don’t change
![]() - Turn off
- Turn off
![]() - Turn on
- Turn on
Tips and tricks
| • | You can use the image or photo of a keyboard to edit a new on-screen keyboard according to it. To do it, select the Add Background command on the Edit menu and open the necessary image file. After configuring the keyboard, you can remove the image by selecting the Clear Background command on the Edit menu. |
| • | It might be easier to create a new keyboard if you use an existing one as a basis. To do it, select the keyboard that looks mostly like yours, and save it under a different name by selecting the Save As... command on the File menu. |
| • | Right-click the on-screen keyboard while editing it to add another point with the cursor coordinates to the currently edited key. |
| • | When configuring complicated keys, it might be easier to use a txt file containing all of the information about the keyboard. Keyboard files are stored in the Keyboards subfolder. |
| • | All modified keyboard txt files are stored in the Application Data folder. You can see the full path in the caption of the Edit Keyboard Type window (for example, “C:\Users\<User>\AppData\Roaming\ComfortSoftware\CKeyboard\Keyboards\”). You can move files from this folder to the Keyboards subfolder of the application installation folder. |
| • | To delete an existing keyboard type, delete the file with its description from the Keyboards subfolder. |
| • | To create a few keys with the same action assigned to them, add the point [-1, -1] to the points list. This special point means that the points of one key end and the points of the next key start. Some on-screen keyboards have two space bars or two Enter keys created using this method. |
See Also
How to install another language and keyboard layout