


Customizing the keyboard type
You can customize the size of the on-screen keyboard, as well as the arrangement, appearance, and size of its keys.
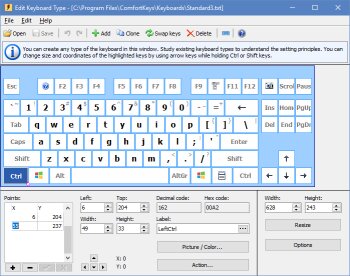
To edit the on-screen keyboard, open the Settings dialog box, select the On-Screen Keyboard item, and then click the Edit... button. By default, the current keyboard type will be opened. To edit another keyboard type, click the File menu, and then click Open.
When editing the keyboard, you can use two types of virtual keys:
| • | Square keys are used by default. Specify only two points for them: the upper-left corner and the lower-right corner. You can use the Width and Height fields for such keys. |
| • | Keys consisting of lines can take any shape. To configure them, use the Points table to specify all points that should be joined by lines, one by one. The last line will be automatically drawn between the first and last points. |
You can specify all parameters for the keys via the fields in the lower part of the window.
When editing the keyboard, you can use the following features:
| • | Use the mouse pointer to select several keys at once by holding down the Shift key. |
| • | Use the arrow keys to resize one or more selected keys by holding down the Shift key. |
| • | Use the arrow keys to change the position of one or more selected keys by holding down the Ctrl key. |
| • | Change any label. The new label will be displayed on the keys instead of the standard label or character. For instance, you can assign the “Customers” label to the F2 key. You can also change the font of the text or use special characters. |
A key of the on-screen keyboard does not have to repeat a key of the physical keyboard. It can also type a text of any length or switch the keyboard to another page of symbols.
Adding and editing keys
| • | Add puts a new key on the free space of the keyboard. |
| • | Cut, Copy, and Paste (Ctrl+X, Ctrl+C, Ctrl+V) move and copy the selected keys through the clipboard - one key or several at once. The keys are placed on the clipboard as text, so they can be pasted into the same keyboard, into another keyboard, or even into a text editor. Pasted keys keep their shape, appearance, and position; when that place is already taken, the copies are shifted a little to the side. Paste is available only while the clipboard holds keys copied from the editor. |
| • | Edit opens the properties of the selected key. |
| • | Delete removes the selected keys from the keyboard. |
Add and Edit open the Key window. Choose what the key does in the Kind box, and the window shows only the fields that this kind needs. You can change the kind of an existing key at any time.
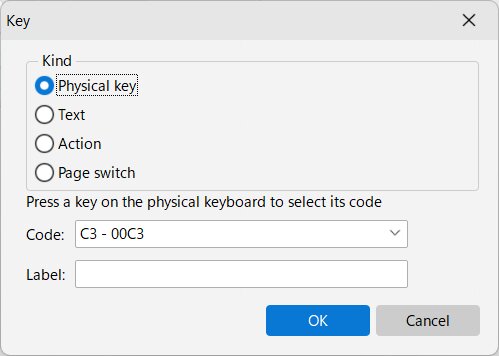
The Label field is optional for every kind. While you leave it empty, the key shows what it does: the name of the physical key, the text it types, the name of the action, or the name of the page it opens. Keys that switch to the next or the previous page have no such name, so give them a label of your own - the supplied template uses arrows.
Kinds of keys
| • | Physical key sends the same code as a key of the physical keyboard. Select the code in the Code: list, or simply press the key you need on the physical keyboard. |
| • | Text types the text from the Text: field. The text is not limited to a single character, so one key can type a smiley, a currency symbol, or a whole word. |
| • | Page switch opens another page of the keyboard. Choose the target in the Page: list: a page by its name, Base layout to return to the letters, or Next page and Previous page to leaf through the pages in order. |
Two keys with the same code
A code may be used by two keys of the keyboard. This is how a layout gets a separate Enter key on the numeric keypad, or a second Shift key. When you add a key with a code that is already in use, the editor offers to create the second key; the code field then shows its number, for example 0D (2). A third key with the same code is not allowed. Changing the code of an existing key instead swaps it with the key that already uses that code.
Both keys are independent: each has its own shape, appearance, and label. The application decides by itself which of them belongs to the numeric keypad - the one that stands to the right - and highlights exactly the key you press on the physical keyboard.
Pasting checks the keys against the keyboard: a physical key counts as existing when its code is already used by a key of the same kind - regular or extended. If exactly one of the pasted keys exists, the Key window opens and proposes a free code for the copy; this is how you copy a key that the keyboard already has. Choose the existing code in that window to create the second key instead. If several of the pasted keys exist, nothing is pasted, and the editor reports it. The Enter key of the numeric keypad copied from another keyboard is therefore pasted next to the regular Enter without any questions: it is the extended key, and a layout may have both.
Symbol pages
A keyboard can hold several pages of keys. The base layout keeps the letters, and the pages hold digits, punctuation, or any other symbols - the way it works on a phone. Use the Page: list on the toolbar to choose the page you are editing, and the Pages... button to manage the pages themselves.
| • | Add empty page starts a page from scratch. |
| • | Add page as a copy of the base layout repeats the shape of the letter keys, so the page looks like the keyboard the user already knows. |
| • | Add page as a copy of the current page is convenient for a second page of symbols. |
| • | Rename page and Delete page work with the page selected in the list. |
The opened page stays until another key switches it. The keyboard returns to the letters when it is hidden or resized, so the user never finds it on an unexpected page. Do not create more than 32 pages: the ones beyond that are dropped when the keyboard file is read.
The ready-made page template
You do not have to build the pages by hand. The Add the "&123" template button in the Pages window creates two pages of digits and symbols at once, together with the key that opens them from the base layout. The TouchScreen keyboard supplied with the application is built exactly this way and can be used as an example.
Note: Symbol pages appeared in version 10. Earlier versions do not understand them, and saving such a keyboard there removes them, so the editor warns you about it.
Assigning an image to any key of the on-screen keyboard
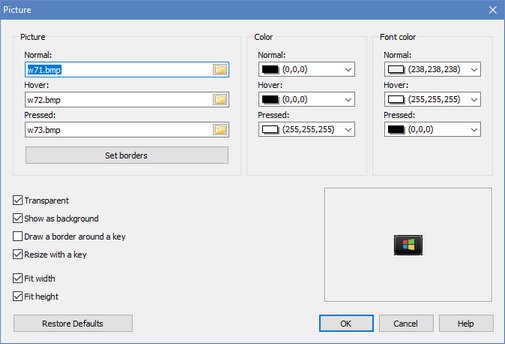
Picture (Normal, Hover, Pressed)
You can assign an image to each key state, or use the same image for all key states.
A key picture can also be a vector image in the SVG format. The file selection box opens in the “Icons” subfolder of the “Keyboards” folder, where a set of ready-made icons is supplied with the program. The chosen icon is copied into the keyboard file itself, so a keyboard stays a single file with no separate image files next to it, and the icon stays sharp at any size of the key and at any zoom.
| • | Normal – The key in its normal state |
| • | Hover – The highlighted key, when the mouse pointer hovers over it |
| • | Pressed – The key when pressed |
Set borders
You can set borders for the picture on the key. When the application resizes the picture, the borders will not change.
Color (Normal, Hover, Pressed)
A key fill color, which is used only if the Picture setting is not used.
Font color (Normal, Hover, Pressed)
You can specify the font to be used for each key state. Font colors can be set even if no images are assigned to keys in the previous fields. If you keep the default setting, the application will use the color values from the theme’s settings.
Transparent
To let the key behind the image show through the image background, select the Transparent check box. To make the image background solid, clear the Transparent check box.
Note: The Transparent property works only for images in the Bitmap format.
Show as background
If this option is on, key labels and hotkey icons will be rendered on top of the key image. Otherwise labels and icons will not be shown on the key.
Draw a border around a key
This option comes in handy if the image completely replaces the default style of the key. For example, see the SkinMulticolor keyboard.
Resize with a key
If this option is on, the image will be resized when the key size changes.
Fit width, Fit height
If this option is on, the width and/or height of the image will always be equal to the width and height of the key it was assigned to, respectively.
Additional keyboard settings
If you select this keyboard, Comfort On-Screen Keyboard Pro will change the specified settings:
| • | Change the Fit width option regardless of the application’s settings |
| • | Change the Lock aspect ratio option regardless of the application’s settings |
| • | Always move the keyboard to the lower edge of the screen |
| • | Always display labels and icons in the center of keys |
| • | Always transparent keyboard background |
| • | Fixed font size for all key labels (if empty, use the one from the application’s settings) |
| • | Dividing points – This option is used when the keyboard size changes. The keyboard splits along the specified points, and the keys slide in opposite directions. |
States:
 - Don’t change
 - Turn off
 - Turn on
Tips and tricks
| • | You can use the image or photo of a keyboard to edit a new on-screen keyboard according to it. To do it, select the Add Background command on the Edit menu and open the necessary image file. After configuring the keyboard, you can remove the image by selecting the Clear Background command on the Edit menu. |
| • | It might be easier to create a new keyboard if you use an existing one as a basis. To do it, select the keyboard that looks mostly like yours, and save it under a different name by selecting the Save As... command on the File menu. |
| • | Right-click the on-screen keyboard while editing it to add another point with the cursor coordinates to the currently edited key. |
| • | When configuring complicated keys, it might be easier to use a txt file containing all of the information about the keyboard. Keyboard files are stored in the Keyboards subfolder. |
| • | All modified keyboard txt files are stored in the Application Data folder. You can see the full path in the caption of the Edit Keyboard Type window (for example, “C:\Users\<User>\AppData\Roaming\ComfortSoftware\CKeyboard\Keyboards\”). You can move files from this folder to the Keyboards subfolder of the application installation folder. |
| • | To delete an existing keyboard type, delete the file with its description from the Keyboards subfolder. |
See Also
How to install another language and keyboard layout